Wednesday, April 15, 2015

A Kalman Filter for a Robot Car

This past week, I have spent quite a bit of time working on a simulator for a two-wheel differential drive robot.  The idea was to use simulated encoder and range finder data and an Extended Kalman filter to determine the location of a robot.  My implementation is written in Python and hosted here.

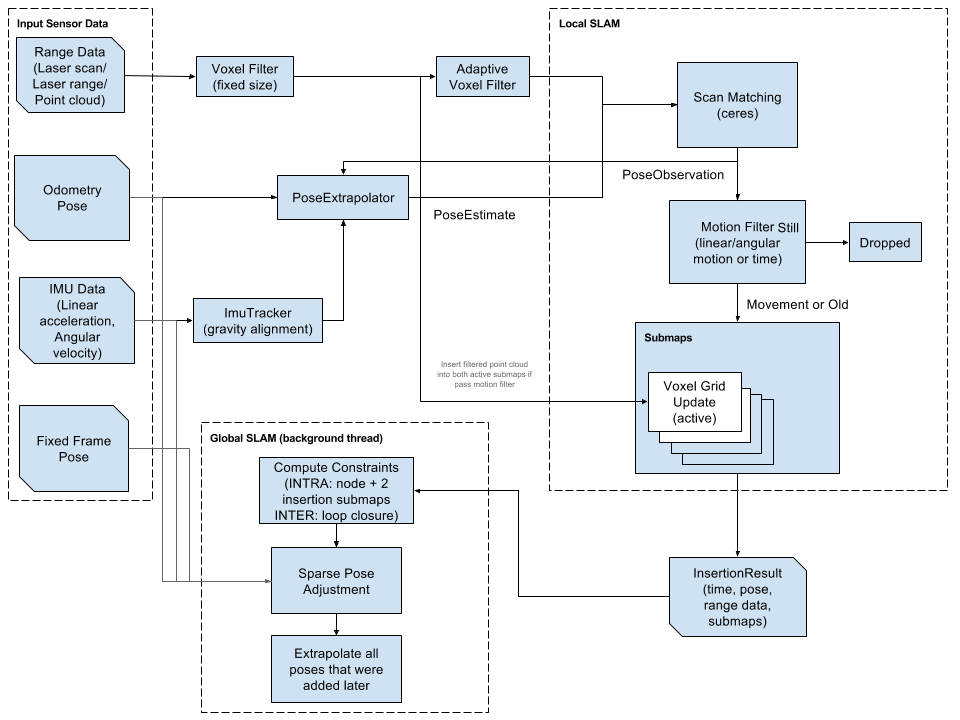
The system is modeled as having two inputs - The left and right wheel speeds.  The robot is externally given control inputs, but they are unknown to the Kalman filter.  The only inputs to the Kalman filter system are the encoder values and the range finder values and a set of known landmarks (this is to simulate mapping or some other landmark detection).  The encoder inputs are Vl and Vr.  From these values, we can surmise the average velocity V, and the rotational velocity w of the robot.
V = (Vl + Vr)/2
w = (Vr - Vl)/L, where L = length between wheels 
We can then use the image below to determine the simple version of the equations of motion of the robot.
An image of a differential drive robot.
From this system, we can surmise that the equations of motion, in discrete form, are:
x(k+1) = x(k) + V(k)*Cos(theta(k))*dt
y(k+1) = y(k) + V(k)*Sin(theta(k))*dt
theta(k+1) = theta(k)  + w(k)*dt
This means that we can assign the system states to be X, Y and Theta.  Because the system model above is ideal, we also need to add in a Gaussian noise value for each state. Now the system looks like this:
x(k+1) = x(k) + (V(k) + Nv) *Cos(theta(k))*dt
y(k+1) = y(k) + (V(k) + Nv) *Sin(theta(k))*dt
theta(k+1) = theta(k)  + (w(k) + Nw)*dt
The Kalman filter has two steps. The prediction step, and the update step.  The prediction step uses the system model, previous state values and control inputs (in this case, encoder values) to create a prediction (a priori) of the new states of the system.  It also creates an estimate covariance matrix, that is essentially a mathematical way to determine how much you trust the sensor values and the prediction.  The matrices needed for the calculation of the prediction step are the A, G, Q and P matrices.  A is the Jacobian, with respect to the system states, for the model shown above.  G is the Jacobian with respect to the noise values.  Q is a matrix built up by the covariances of the process noise.   The prediction step equations are:
X^(k+1) = f (X(k), U(k)) , where f (X(k), U(k)) is the original system model
P^(k+1) = A*P(k)*transpose(A) + G*Q*transpose(G)
The update step (a posteriori) is a bit more complicated.  The idea is to use a separate sensor (or multiple) to improve the quality of the prediction.  In this case, we will use a range finder to find landmarks and use those landmarks to determine where we should be and correct the position.  Of course, the range finder is not a perfect sensor and has Gaussian noise too.  This will be included in our calculations.  There are 4 parts of the update step.  The first is to calculate the difference in the measured values (from the range finder) and the predicted values from the previous step.  The h matrix, or measurement matrix, puts the states from the last step into the same space as the measurement values.  Then, we also need to calculate the Kalman gain.  This gain is a matrix that tells us how much we want to use the new measurement to update the prediction.  It is calculated using the sensor covariance matrix, the estimate covariance matrix and the Jacobian of the h matrix, H.  Using the residual and the Kalman Gain, we update the state prediction.  Finally, we updated the covariance matrix, using the Kalman Gain and H matrix.  The actual formulas are laid out below.
Y = Z - h(X(k))
K = P^(k+1)*H*(H*P^(k+1)*transpose(H) + R)^-1
X(k+1) = X^(k+1) + K*Y
P(k+1) = (I - K*H)*P^(k+1)
In order to make the landmark detection work, the x and y positions of the landmarks were augmented to the states matrix. X.  By adding those values, the Kalman Filter became an EKF and many other matrices had to be changed, as well.   The reason for doing this, is to keep track of the landmarks and allow them to make changes to the prediction, only if they are seen.  In my case, they are always seen, but in an real-world scenario, the range finder might not be able to see all of the landmarks or misses them.

Here are some results of my work.  A typical run can be seen below.  In this image, the actual position of the robot is in blue, the initial prediction is in green and the final prediction (after landmark detection with 20 landmarks) is in red.  The robot tracks the random path very well over 2 minutes, with a time step of 0.1 seconds.
The error between the actual and updated paths for this run can be seen below.  There was an average RMS error of 3.45 units over the course of the path.  What is neat, is that the Kalman Filter seems to correct itself when there is a lot of error. If odometry was the only sensor used, the error would grow much faster, and it would not correct itself.

Tuesday, April 7, 2015

The Lidar-Lite Ranging Sensor


Currently, I am working with the new PulsedLight Lidar-Lite range sensor, a small Laser emitter/receiver that can measure distance in one direction.  It is a terrific sensor that I bought for only $89 on-line.  A typical Lidar sensor is usually in the hundreds or even thousands of dollars, so this is quite a bargain, and something that the at-home maker can afford.  Not only is it cheap, it als has terrific accuracy and works with both PWM and I2C.

As of right now, I am writing a couple of libraries in Python and C++ to interface with the Lidar-Lite via I2C.  My work is currently posted here. Most of my experimentation has been using a Raspberry Pi with Rasbian Wheezy.  The idea is to make these libraries portable and then use them on a Robot Operating System (ROS) project, down the road.  Once the library is finished, I will post a quick tutorial on how to use it.   PusledLight also has a great repository of Arduino sketches for use the Lidar-Lite here.  I have tried them out and they work great.  Check it out!

Friday, March 13, 2015

3d Printer Reviews


One of the great perks of my job at Visa Labs is that I get to use 3d printers every day.  In my office, we have 4 printers that I have used extensively.  This post is a review of my experiences with these printers.

Flashforge Creator ($977)
5 Stars

The Flashforge Creator is the first printer we received and has proven to be the most reliable, fastest, easiest to repair and simplest to use printer of them all.  The Creator is one of the many printers to be based off of the original Markerbot Replicator.  It can use the same firmware as the Makerbots and even the same software (Makerbot Desktop, which works well).  It is also open-source, so it is very easy to find information, replace parts, and use open source software like Slic3r or replicatorG.  It can also print most materials with relative ease and had dual extruders which was great for multi-color prints.  The print quality at 0.2 mm layer height is fairly good for an inexpensive printer.

The only downside that I saw with the Creator was that there would often be lifting off of the build plate due to uneven heat on the surface.  Making large parts can be difficult because the build space is rather small and often there will be some problem like filament getting stuck or the material not sticking to itself.  Most of these problems are easy enough to fix with software or with creative solutions.  By far this printer exceeded my expectations and I would highly recommend it to beginners and advanced users alike.

Solidoodle 4 ($599)
4 Stars
The Solidoodle 4 is another quality printer on the lower price range end of the spectrum.  I particularly liked the enclosed build area and overall build quality of the printer.  It was simple to fix any problems and had a great filament spool holder and feeding hole covered in rubber.  There were never any filament feeding problems at all, which is great because pretty much every other printer gets jammed all the time.  It also prints both ABS and PLA, which was good.

The downsides that I found with this printer included the software (Repetier Host) and the warped build plate.  First, the software was very odd compared to other software out there.  It gives you lots of control and can manually move the printhead which was nice.  However, it was non-intuitive to use and had alignment issues.  If you pressed the Home button multiple times, the printer would home each axis to different places.  It also caused the printer to not print the object in the same place that you wanted it to be printed.  This was frustrating, but even more so was the fact that the build plate that came with the printer was completely warped.   Because there are only three adjustments screws under the plate, it was not possible to manually un-warp the plate, so we could only print small objects in the area that was not warped.  Besides these small problems, we got very good quality prints at 0.2 mm layer height.


Makerbot Replicator 5th Generation ($2899)
3 Stars

MakerBot Replicator Desktop 3D Printer - 5th Generation
Makerbot is probably the most well-known 3d printer company around, but I was not so impressed with the 5th Generation Replicator.  There were a few positives that I found.  First, the Makerbot Desktop software is very good (although it takes some time to learn how to customize it).  It is very simple to use and can create an SD card x3g  g-code file for other printers as well.  I also liked the beautiful navigation screen and control wheel.  It made it easy to do things like align and level the build plate.  The build quality at 0.2 mm was mediocre and had a lot of bumpy edges, but certainly wasn't awful.

The negatives, however, were numerous.  First off, you could only print PLA because the build plate was not heated.  For an almost $3000 printer, that is pretty pathetic.  I also hated the new "Smart Extruder".  If by smart, they meant, gets jammed all the time, they did a great job.  Also, the blue tape they give you is absolutely useless.  From my experience, PLA does not stick to that stuff at all.  Also, the fact that the material is hidden inside the machine is awful, especially because the shape of the Makerbot spools are not the same as anyone elses.  If you want to use a 3rd party material, you have to make your own spool holder and hope that it works.  Lastly, I even had alignment issues with the onboard software.  The system thought the build area started in the middle and aligning it caused the print head to start bouncing off the wall repeatedly.  It was awful.  

Having said all of this, I would love to try out the Replicator 2, because I have heard much better things.  But consider me unimpressed by this Replicator.

CubeX Trio ($3295)
1 Star

The CubeX™ Trio 3D Printer
I have to say that I was most excited to try the CubeX Trio because of its specs.  Huge build space, three extruders, great motors, high accuracy and so on.  Boy, was I way off.  This thing is a piece of junk.  It seems like it is very well built, looks nice and has a seemingly great print head with fans.  And the two full prints that I managed to make, came out pretty well. These are the only nice things I can say about this machine.

Here are the problems I faced using this printer.  The software is horrible.  It is hard to use, has basically no ability customize anything and worst of all, you cannot connect it to the printer.  This means that you have to get everything right with the design and then put that design on the provided USB stick and plug it into the printer.  There is a growing group of people who have switched over to Kisslicer (open source) and use a post-processor to convert the g-code to the .brb format that the printer reads.  This was not simple to figure out and took me a very long time.  Kisslicer, I will say, is a good program with a lot of functionality.  The next problem is that the folks over at CubeX tried to do WAY too much with the onboard software.  The leveling and alignment process is all in software, so inevitably there are problems with mechanical heights versus software heights.  Now the company says that this printer can be used with PLA or ABS.  If you use ABS, you should use the included glue stick because the build plate is not heated.  Again, this is ridiculous for a three thousand dollar printer, but I digress.  This glue is like superglue, especially with the plastic build surface.  After finishing (or not finishing) any print, it would take me an hour or more to remove the print from the surface.  This is absurd and frankly intolerable.  But the worst part of this printer was the printing experience.  The printer would heat up, start extruding into the waste bin, then do about ten movements around the build area for some reason.  Then it would start to print, but it would print so slowly, that it was impossible to print fist sized object in less than 24 hours.  I tried to adjust the speed with Kisslicer, but to no avail.  Then came the extruder jamming problem.  It seemed that every single print I ever did with the CubeX, the extruder got jammed.  The worst part about the printer getting jammed was that the onboard software did not give you an option to pause the print and change the filament.  IT JUST CANCELLED THE PRINT!  So, again and again, I would waste hours on a seemingly good print only to have it fail in the middle and ruin my day.  There were countless more problems with this printer, but these were the most pronounced. I would recommend no one ever buy a CubeX printer.


Tuesday, March 3, 2015

The Wandboard and It's Mysteries

The Wandboard
For a while, at work, I was building up embedded systems for our team to use as development platforms.  One board, in particular was the Wandboard.  It is an ARM development platform built on the Freescale IMX6.  Although, I had a lot of trouble with this board, I was able to learn quite a bit about embedded OS's.

The Wandboard has a many choices of Operating Systems and the website features a few standard images.  My goal was to use Linux and our flavor of choice was usually Ubuntu.  Trying out the Ubuntu image, provided by the Wandboard people, we found that it was generally fine, but it ran graphics remarkably slowly.  Many other people had found the same thing.  Also, any updates to the system caused crashes.  This was no good.  So instead, I began looking for alternatives.

One alternative that I spent a very long time on was Robert Nelson's eewiki post about compiling Linux for the Wandboard from scratch.  This allows you more customization and you can learn about how an OS is built up.  After doing this procedure, many problems occurred, including no screen (which was fixed with uBoot args), update failures (from wrong repos), X11 failures (due to graphics drivers not being compatible after updates), and so on.  This was frustrating.

Next, I tried Yocto.  At first, I didn't quite understand what Yocto was, but after using it, I became familiar.  Yocto is a custom archlinux setup that is built on a development machine with all of the possible packages that you need for the system.  It is meant for production environments where the system setup just needs to be flashed to the device and never touched again.  This wasn't really what I was looking for, but I tried it anyway.  Boy, does it need some work,  First of all, building a correct system could take months.  Using bitbake (the graphical package selection tool), the system would fail after many packages.  The system is cool because it goes out and downloads the necessary files (based on package requirement files), compiles them for your particular system and then installs them into the image.  However, there are so many opportunities to fail, that it takes forever to get to the end of a setup.  I was able to finish a few setups and they worked just OK.  In the future, I would try to plan out exactly what packages and dependencies I need and go from there.

Lastly, I tried some other images from the Wandboard Wiki.  Again, these worked pretty well, but always, I ran into some problem with display, graphics and other things.  One big area of concern to me, is that I could never find an image that allowed the Wifi to work and the graphics acceleration to work at the same time.  There were images that had one or the other, or you could download the drivers for the wifi (BRCM29), but never both.  This just shows that Wandboard needs some serious work.

Later, I was able to get a UDOO Quad, which is essentially the same hardware, and I put one of their stock images on it and it worked perfectly.  Honestly, I was amazed that Wandboard's are so popular because they are a trainwreck to use.

Working with Google's Cartographer SLAM Package

At my current position, at Canvas Construction, I have worked with a number of SLAM and localization packages. In the past few years, my wor...